 with Symantec VIP Push")
Integration with Symantec Multi-Factor Authentication
Symantec Multi-Factor Authentication can be integrated with vIDM in two ways:
- via RADIUS using Enterprise Gateway
- via SAML using VIP Login service
Limitations of RADIUS integration
Integrating vIDM via RADIUS with Symantec Enterprise Gateway to use Security Code is seamless and straightforward.
References below:
https://support.symantec.com/en_US/article.INFO3360.html
Typical RADIUS integration involves configuring a Validation Server on Symantec Enterprise Gateway. This validation server allows you to configure multi-factor authentication using Security Code.
As of writing this I have not been successful in configuring vIDM with Symantec Enterprise Gateway using RADIUS for authentication based on VIP Access “Push” mechanism.
I suspect this issue to be related to the fact that vIDM when configured with Enterprise Gateway via RADIUS always expect the Security Code to be entered and the field “RADIUS Passcode” is always displayed like shown below. This prevents the redirection to the subsequent Push Notification screen.

From the user experience perspective, it is not very convenient for the user to enter the Security Token during login. He has to take out his cell phone (or VIP token device), generate the one-time security code and key in the code in the vIDM portal. Quite cumbersome compared to you getting a “Push notification” on your cell phone that you need to be swiped to Allow.
Due to the above-mentioned limitations that I encountered, I integrated Symantec VIP Login using SAML.
Integrating Symantec VIP Login Service with vIDM directly (not through Symantec Enterprise Gateway)
For this integration, vIDM is the Service Provider(SP) to Symantec VIP login which is the second factor Identity Provider (IDP).
-
Retrieve SAML certificate and Metadata XML file from vIDM
 Download the Metadata XML file for vIDM as “SP” and the SAML certificate.

-
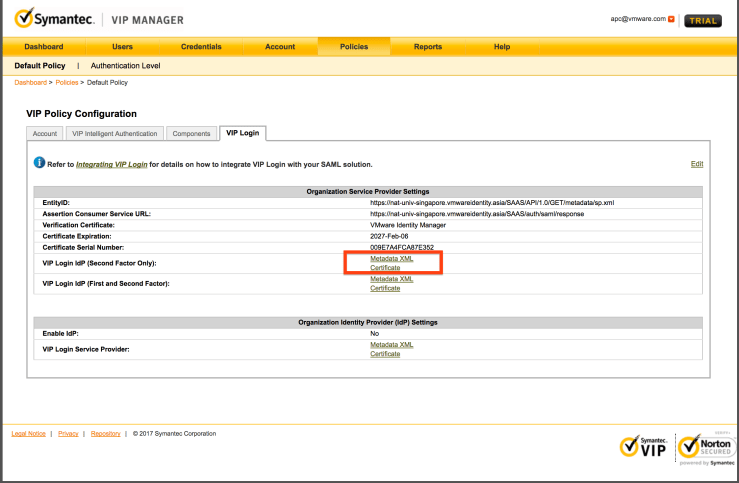
Retrieve SAML certificate and Metadata XML file from Symantec VIP Manager
You can download the Metadata XML for VIP login as “IDP” and SAML certificate from the below section.
-
Configure VIP Manager
Import the vIDM certificate and the XML file into the Symantec VIP Login. This will establish a SAML trust between vIDM as SP and Symantec VIP Login as the second factor IDP.
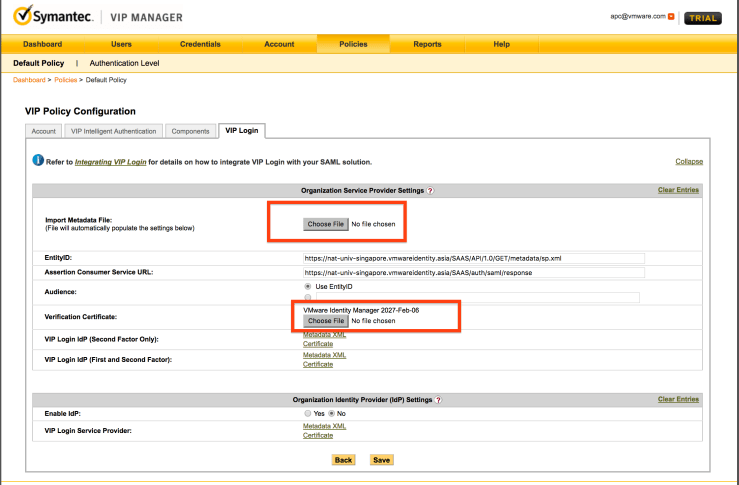
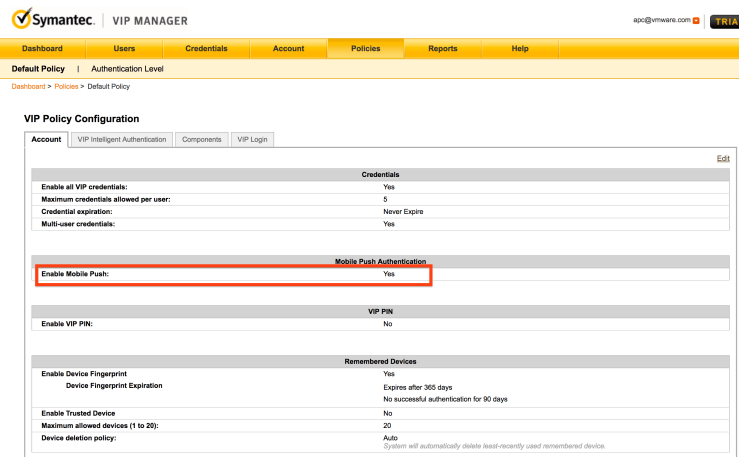
Enable Mobile Push as the authentication option.
-
Configure Symantec VIP Login as a IDP in vIDM.
As shown in the screenshot below, provide the VIP Login Metadata XML, choose the domain and network range and leave all other values as default options.

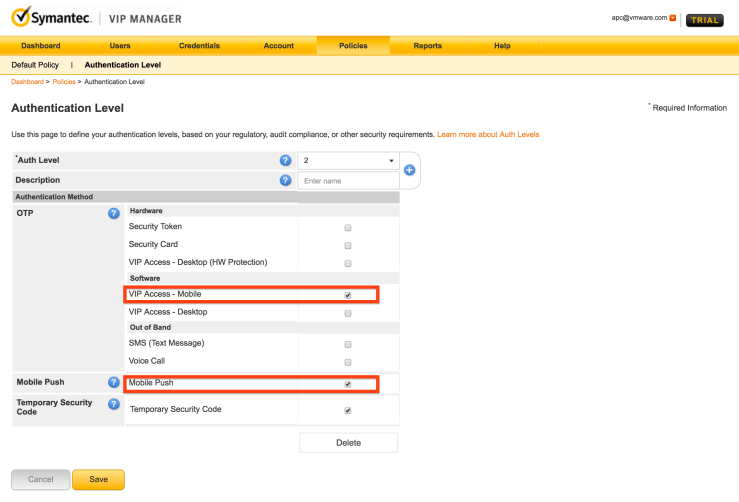
Configure the default Authentication Method as “Push” and SAML context as Password.

-
Edit the Network Policy to enable the previously created Push Policy

The user experience looks like this.

Any chance there are updated links to the articles you referred to and have you been able to successfully use RADIUS using Enterprise Gateway. I’m attempting to configure using Symantec VIP via Radius / Gateway server. prompting the user of providing password+VIPCode.
http://pubs.vmware.com/vidm/topic/com.vmware.wsair-administration/GUID-79EF08F7-B2FD-4E85-A2A8-1FEA28DDD414.html